What is the Victoria program for. How to test the hard drive in Victoria and how to fix bad sectors (bad blocks) in a running Windows. Bad sectors on the hard disk
Victoria hdd is a program for broad analysis hard disk computer, laptop, or external hard drive. This program is used by both beginners and professionals, as it has a very user-friendly interface with many tips, and at the same time, the program provides a large number of possibilities in setting up a hard disk and repairing it.
Victoria hdd features
- Works directly with Windows OS.
- View full technical information hard drive.
- View SMART information.
- Scanning the hard disk surface and finding bad (Bad) sectors.
- Performing regular formatting.
- Recover or reassign bad blocks of the hard disk surface.
How to download and run the program
Victoria hdd 4.47 is completely free software.
You can download the program from the official website http://victoria4.ru/
After you have downloaded the program, you just need to unpack it and immediately start working without installation.
For the program to work correctly, it must be run as an Administrator.
After starting the program, we will see the interface where necessary, first of all, select hDDwith which we are going to work. To do this, simply select the disk we need with one click. 
After selecting the disk, the passport information of the hard disk will be displayed in the left window:

Hard disk SMART information
In order to view information about the state of the SMART hard drive, select the hard drive we need and go to the SMART tab.
On the SMART tab, press the "Get SMART" button and wait while the program scans the hard disk information.
After the scan is over, we will be able to see the general state of the disk by a signal in the upper right part of the screen near the "Get SMART" button, in my case, the state of the hard disk is good, so the program displays a "GOOD" signal, if the disk is in a critical state then at this place there will be an inscription "BAD". 
On the left, we see detailed SMART information.
To determine the state of the hard disk, you need to analyze the following points:
- Reallocated sector count - the number of bad (BAD) sectors that have been reassigned. If this number exceeds 10, then you should think about transferring information from this drive
- HAD Temperature - the average temperature of the hard drive. This parameter should not exceed 40 ° C if the temperature is higher. Then you should think about cooling your hard drive.
- Seek error rate - the frequency of errors during the operation of the heads, this value should also be zero, if the number is greater, then it is worth diagnosing the hard disk for overheating or vibrations.
Scan hard disk for bad (BAD) sectors
In order to scan the hard disk surface for bad (BAD) sectors, go to the "Test" tab.
Consider the interface of this tab. The first thing to pay attention to is a large gray field, in which the scanning process and the surface of the hard disk will be graphically displayed.
On the right, we can see a field that will display the number of sectors with different response times.
Learn more about the field that displays the number of sectors with different response times. 
The first 3 types of blocks are valid on the surface of the hard disk, they display the number of sectors with a valid response time, which will allow using the hard disk without problems.
Green sectors are also acceptable and may be present, but a large number of them will significantly reduce the speed of writing and reading the hard disk. Such sectors may be present in large numbers on old drives, or on hard drives that are in constant continuous operation.
All other sectors (orange, red, Err) can cause the system to freeze or slow down the hard disk. 
Scan options and what they mean:

Restore - this option is used to restore bad sectors if they can be restored, but this option is available only in the paid version of the program.
If you have decided on the scanning parameter, then select it and press the "Start" button. We are waiting for the end of the scan, while the program is running, we can follow the found and successfully corrected bad (BAD) sectors in the status field, which is located at the bottom of the program window. 
Conclusion
Victoria HDD program is a good tool for viewing hard disk information, or SMART status, you can view full passport information and SMART status, which cannot be done in most similar programs, or you can, but the information will not be complete. If you do not understand much about recovery and minor repairs of hard drives, but you want to diagnose and return the drive to a good state on your own, then this program is for you. But if you need to carry out more accurate and high-quality work with a hard drive, then I recommend using the program, it is a more professional tool for working with hard drives, and has more functions.
A hard disk is a complex physical device designed to record and store information. The disc surface is divided into tracks. The vertical stack of these tracks forms a cylinder. The track is split into smaller sections called sectors. Each sector is labeled. Their number depends on the interface used to communicate with the disk.
The hard drive is vulnerable. The reasons for the failure can be a malfunction of the software of the device, failure of the controller, power failures, disruption of physical contact with the interface, sticking of the magnetic head, etc. The main defects of disks are sectors with a damaged magnetic coating. Information cannot be stored on these sites.
The bad sectors are called bad or bad sectors. Especially dangerous are bad sectors located on the zero track, because this is the boot area.
To determine the presence of bad sectors and the possibility of their recovery, Belarusian programmer Sergei Kazansky has developed the Victoria utility. The latest release of the program is 26.06.2013. The license type is Freeware, which makes it especially popular.
Appointment
The Victoria program allows you to perform low-level testing of a hard drive with a parallel connection interface - IDE (ATA - Advanced Technology Attachment) and SATA interfaces - a serial connection interface. The output is detailed information about the physical state of the drive, its performance, errors.
The Victoria program performs a deep analysis of the state of the HDD with the possibility of recovering bad sectors. This tool can be used both by professionals of the service center and by ordinary users to assess the performance of a drive, the ability to correct errors, and analyze all the physical characteristics of a hard drive.
Video: Victoria HDD scan
Key features
- comprehensive information about the technical characteristics of the hard drive;
- analytics of HDD self-monitoring parameters;
- testing of many technical parameters;
- the ability to change the volume of the disk due to bad clusters;
- surface plotting;
- elimination of used bad clusters - replacing them with backup ones;
- hDD performance analysis;
- determining the speed of access to clusters;
- cleaning the disk from information beyond recovery;
- device protection by setting a password;
- the ability to copy any sectors to a file;
- context help system;
- other useful features.
Installation and launch
There are:
- boot versions of the program. In this case, you need to create either a boot floppy disk or a boot disk. The floppy disk creation tool is the makedisk.bat file. To create a bootable CD, you need to unpack the program file and burn its ISO image to disk;
- not a bootable version. The program is unpacked directly to your hard drive.
In the first case, after downloading from the devices, you can start working with the program.
In the second, in order to get a complete picture of the state of the hard drive, a number of conditions must be met:
- disable the controller channel of the tested disk;
- quit all running programs;
- run Victoriyu on a warmed up disk only.
Starting from the operating system is performed by the vcr446f.exe application.

After launching a window with a clear English-language interface in front of the user.
HDD recovery using Victoria
The first tab is Standart, which provides information about the passport of the hard disk or the drive that we want to test. (The selection is carried out in the upper right window of the section).

Photo: Hard Drive Passport Information
The second tab is Smart.

Photo: tab for checking disk self-test parameters
Here such parameters of the system are checked by itself. hDD testing as:

On the right in the window, press the GetSMART button and get an estimate of the health (Health) of the hard drive as a whole (next to the GetSMART button) and by parameters.
The third tab is Tests. The main partition that allows you to quickly detect and repair disk sectors.

The hard drive is split into many clusters of the same size. The Victoria program addresses each cluster during testing. The duration of the call is analyzed. The longer the waiting time, the more likely a physical defect in this area.
There are many reasons for defects:

In this section, the test start modes are important, which can be selected in the lower right window. These are the modes:
- Ignore - allows you to run the test in information mode, without making adjustments;
- Erase - the mode with cleaning the hard drive (used carefully and rarely);
- Remap - check with simultaneous replacement of bad sectors with working ones. Can be used after checking in ignore mode if bad clusters are found;
- Restore - recovery. Used in the case when the remaining sectors not reassigned after checking in remap mode.
To start the test, press the "START" button. The checked sectors are graphically displayed in the left window and are color-coded. In the windows on the right, you can see the percentage of the tested device volume, the number of tested clusters.

Bad sectors on the HDD are hidden by replacing them from the spare area of \u200b\u200bthe hard drive. Are reassigned so that they are no longer readable. The utility allows you to restore only a hard drive that has no physical damage in detail. If wear has occurred, or an obvious breakdown, then, of course, you cannot fix it programmatically.
Testing by the utility is considered low-level, but has high performance. So the test of a 232 GB device takes about 60 minutes.
After the testing procedure, error correction or recovery, you need to restart the computer and re-check. Its result should improve.

If, as a result of testing, there are too many bad clusters and they are at the beginning of the hard drive, then such a disk is not recommended. Viktoria contains a useful function in this case, which allows you to halve the volume of the hard drive due to bad sectors. After this procedure, the HDD can be used as a second disk, or an external drive. It is not suitable for installing an operating system.
Video: Diagnostics and repair of HDD
Legend
During testing, rectangles of different colors can be observed in the window.
They visually display a picture of the state of the disk:
- the sector marked in white is considered normal. The response from him comes within 5 ms;
- light gray. Reply within 20 ms;
- gray. The answer comes within 50 ms;
- green. Response within 200 ms;
- orange. Response within 600 ms;
- red. Sectors that will no longer work;
- blue. "Deadly" sectors. Cannot be restored.

All these designations are in the test section, in the lower middle window. Next to them are numbers indicating the response time from the cluster to the program. Gray and white sectors are not damaged. Green is also a worker, but already striving for the bad.
Orange - bad sector, which can be restored either by low-level formatting, or by S. Kazansky's utility.
In order to be able to use the functions of restoring these sectors, check the boxes opposite the designations in the check boxes.
For the full operation of the computer, it is recommended to periodically test the devices that make it up. The main device is the hard disk. It usually hosts the operating system. The comfort of the user's work at the computer depends on the operability of the disk, its performance. Performing production tasks.
A high-quality, high-speed HDD testing program is essential for both a technical support specialist and an ordinary user. The functions of full-fledged and, which is important, fast low-level testing are performed by the program of Sergey Kazansky Victoria.
Most modern computers run under an operating theater windows system, so it is recommended to use version 4.46. It can be found on the manufacturer's website. The latest release of the program is June 2013. It is compatible with Windows 7, does not load the registry, and can be launched from any media. Easy to use.

Victoria serves as an assistant in various situations. For example, when buying a used drive to assess its technical condition, when the operating system slows down, for recovery important information... In other matters, and for the removal of irrevocably classified information.
The program is a complete solution that combines the capabilities of several diagnostic utilities for the hard drive and useful functions. It is one of the most widely used programs for recovering bad HDD sectors.
Good day, dear readers, admirers and all other personalities! Today we will talk about diagnostics by the program Victoria(below in the text we will simply call her Victoria or Vika :)). The whole process is divided into 2 parts and 4 stages, and in general it is extremely simple if you follow the instructions.
This diagnosis is needed in order to find and identify his current health.
Unlike the once mentioned utility Chkdsk (“How to check a disk for errors” or “Chkdsk utility”), Victoria described below is a representative of the class of programs that work with the equipment under test directly through the ports, that is, at the lowest level, which allows you to get the most high performance of the possible (you want to achieve better, more extensive and intelligible diagnostics), although it complicates the process of creating and using such software.
Here we go?
We will consider two options for working with the program:
- Part 1: version 3.35 from external media.
- Part 2: version 4.46 from under Windows.
Stage I: installation and preparation for launching Victoria from external media
First, download Victoria (here is version 3.5, which is best suited for diagnostics outside the system).
Having launched the program, you need to select our USB flash drive, specify the file system format and select the image we downloaded, approximately as indicated in the screenshot below:

Attention!
All data on the flash drive will be deleted after clicking on the "Go" button, so it is recommended to first transfer everything from there.
Next, we need to boot from the disk / flash drive where we recorded the image. To do this, insert the disk into the computer, reboot, go to (DEL or F2 button at the earliest stage of the computer boot) and there we set the boot from the disk in the following way (depending on how your BIOS looks like).
Option 1. If your BIOS looks like this, then go first to Advanced Features


Where to put in the first place the boot from the CD / DVD drive as in the picture.
Then exit the BIOS through the "Save and exit setup" and, if you did everything correctly, then wait until this program is loaded instead of the operating system.
Option 2. If your bios looks like this:

Then you just go to the Boot tab, and then you set everything in the same way as in the pictures above (you just select boot from disk as the first one).
and you did not make a disk, but a USB flash drive, then in the BIOS you will need to select the following option:
Or, say, like this:

That is, the name of the flash drive itself and its volume or something like that can be indicated. In general, it's not difficult to figure it out.
Having decided on this, we save the changes and exit the BIOS, proceeding to boot Victoria from the media.
Phase II: Download Victoria and Prepare to Scan
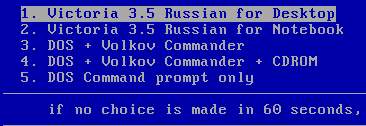
When downloading, you will need to select one of the Victoria options. For a desktop computer, it will be Victoria for Desktop, for a laptop for Notebook, the rest of the items load the DOS shell and the Volkov Commander file manager, that is, in normal cases they are not needed.
Program selection options:
Perhaps, at the first start, you will need to select exactly the hard drive that you want to test (and not the one that is registered in the vcr.ini file - the Secondary Master is indicated in the distribution kit). To do this, press the P key.

A menu with channel names appears. The selection is made with the cursor keys "up" and "down". When you move the cursor, an indication (light bulbs) is displayed in real time, which allows you to judge the readiness of the HDD.
A working hard drive will always have 2 lights on: DRSC and DRDY (some may also have INX). The red AMNF lamp can be lit in the error registers, and the rest must be extinguished. For more information on the purpose of indicators, see the end of the article. After placing the cursor on the desired item, press ENTER.

The last item of this menu is responsible for choosing a hard drive on an external (additional) PCI / ATA / SATA / controller. After pressing ENTER, the search for external controllers and hard drives on them will begin. Only really present and serviceable hard drives in the MASTER position will be determined, the rest of the system will not "notice". When each additional port is found, the table will display:
- The name of the manufacturer of the ATA controller (or its Vendor Code)
- Controller name (or its ID Code)
- Class: EXT / INT / RAID (external, internal, RAID)
- Port address (or dash if it could not be determined)
- Name of the connected hard drive, if it is available on the channel and is working properly
All ports found will be numbered. You just have to select the one you need by pressing the appropriate key and confirm with Enter.
Note:
The program may not find hard drives on some models of Promise controllers. Then press F2 to "give back" the passport. HDD passport is the factory-wired information that characterizes the hard drive family and its individual characteristics.
Scanning works closely with the passport, getting all the necessary parameters from it.
Phase III: scan the disk for errors and problems
Now the most important thing.
To test the surface of the hard drive, press the F4 key. Next, a menu will open where you need to set "Linear reading" and below “Ignore Bad Blocks”. The selection is made with the “Space” key or with the “Right” and “Left” arrow keys. The scan window looks like this:

Attention!
In the third menu item from the top, such actions as "Write (erase)", "Write from file" and in the fourth menu item "BB \u003d Erase 256 sect" erase the information on the disc!
Now press F4 again to start scanning. It remains only to wait for its end.
At the end of the test, if you have not had any errors, you will see something like this:

What is there to focus on? On the right there is a gradation of sectors from dark gray to red. The more orange and red, the worse, in fact. If the red value is especially high, then the disc may have been discarded for a long time, especially if the list of defects is full (and not empty as in the screenshot above).
What else is important to understand here:
- If the hard drive hangs due to a malfunction during scanning, the program waits for about 16 seconds, after which it will move on to the next block, displaying the T (Timeout) icon in the scan field;
- Continuous delays indicate that the hard drive is not responding to commands. In this case, you can try to send a reset command to its controller by pressing F3 (Reset) directly during scanning, sometimes it helps;
- All possible defects and other problems will be described in the "Defects" or "Messages" section on the right;
- You can also check the interface. Its check is selected in the third menu item from the top, by pressing the F4 "Scan" key, i.e. where you chose linear reading.
The purpose of the commands is described in sufficient detail in the help system. Therefore, press F1 whenever you have difficulty.
Phase IV: check the interface
Checking the interface cyclically writes the data template to the buffer memory of the hard drive, then reads from there and compares the read with the write. In this case, the read time from the buffer is measured in the range from 64 to 500 μs.
This test clearly shows what multitasking of the firmware built into the hard drive is - the reading time of different cycles is different and depends on the model of the hard disk and on its operating mode. If there is a discrepancy between the recorded and the read, a message is displayed indicating the time by the clock. The presence of such errors indicates a malfunction of the interface or buffer memory of the hard drive, and such a drive is considered potentially dangerous, since it can distort the information stored on it.
To obtain high reliability, you need to perform this test for a long time, similar to computer tests. During testing, it is recommended to move the IDE cable to diagnose bad contacts, which will be immediately detected by the program.
Note:
Exit the program, button - X.
Leaving Victoria, you find yourself in the "Volcov Commander", from which you exit by pressing the F10 key and selecting "YES", respectively. Then you get into DOS

From where you can exit by pressing Control + Alt + Del. The computer will restart. Remember to remove the disk from the drive and return the boot from the HDD.
Useful information on checking and diagnosing a disk through Victoria
Indication of HDD operation modes and error codes by indicator "lights".
(Originally ATA / ATAPI Standard)
- BUSY (Busy), - the disk is busy processing a command or is frozen. While this light is on, all other indicators are considered invalid and the hard drive can only respond to the "Reset" (F3) command;
- DRDY (Drive Ready), - the drive is ready to receive a command;
- DRSC (Drive Seek Complete) - the disc has successfully finished placing the head on the track. Deprecated. On new hard drives, the assignment depends on the previous command;
- INX (Index), - lights up with each revolution of the disc. On some hard drives it is no longer used or may give an incorrect result;
- WRFT (Write Fault) - write error. Deprecated. According to the new standard and, therefore, on new HDDs: "Device Fault" - device failure;
- DRQ (Data Request), - the disk is ready to exchange data via the interface;
- ERR (Error), - an error has occurred (the error code can be found in the error register).
Error registers:
- AMNF (Address Mark Not Found), - it is impossible to read a sector, usually as a result of a serious hardware problem (for example, on Toshiba and Maxtor HDDs it says about a malfunction of the magnetic heads);
- BBK (Bad Block Detected), - found a bad block (bad block);
- UNC (Uncorrectable Data Error), - the data could not be corrected with a redundant code, the block was recognized as unreadable. It can be both a consequence of a data checksum violation, and a consequence of physical damage to the HDD
- IDNF (ID Not Found), - sector not identified. Usually indicates the destruction of the microcode or format of the lower level of the HDD. For working hard drives, such an error is issued when trying to access a nonexistent address;
- ABRT (Aborted Command), - the hard drive (disk) rejected the command as a result of a malfunction or the command is not supported by this HDD (password, outdated or too new model, etc.);
- T0NF (Track 0 Not Found), - it is impossible to recalibrate to the starting cylinder of the working area. On modern HDD it speaks of a malfunction of the microcode or magnetic heads.
This is a necessary minimum that is worth knowing and understanding. For everything else, you need to use the brain, and questions can be asked in the comments or on ours.
Using Victoria 4.46b under Windows. Instructions for checking disks
Now let's talk about using the latest official version of the program under Windows, namely 4.46.
Having carefully studied SMART and the parameters in it, go to the Tests tab. Its functionality is generally similar to what we did in the first part of the article:

To run these same tests, you need to click the Passp button to get information about the disk that we will test (you can select it on the Standart tab, if you need another one), and then Start.
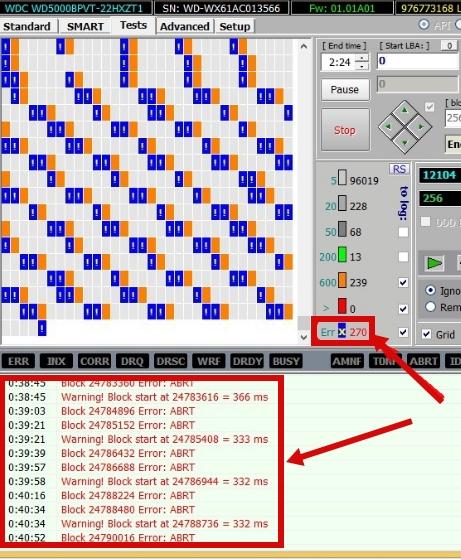
During the check, normal, bad, problematic and other sectors will be identified, the number of which you can see both in the column on the right and in the log below (in particular, there will be more detailed information about the sectors of the beginning of a particular block and so on). All that remains is to analyze all this and decide what to do with the disc next.
In a nutshell, about working with the program from under Windows, perhaps everything. If something is not clear, then first read the entire article, then look at the comments to it, well, and if something is still not clear, then, as mentioned above, contact, for example, our forum or in the same comments ...
We are moving on to the afterword.
Afterword
These are the pies you get.
Often, such diagnostics are needed in case of appearance, taps of the hard disk or any other suspicions that the problem of incorrect operation (in particular, say, partial data loss) lies in the HDD.
Stay tuned and all that jazz. Here you are always glad to help, including;)
PS: For the existence of this article, special thanks to our BSOD-master under the nickname "DJON0316".
A modern computer cannot be imagined without a hard drive. After all, it is he who is the main device for storing user data and installing software on it. Nevertheless, the hard drive has its own resource and is one of the most unreliable devices that are prone to damage. One of the main indicators of wear or damage to a hard drive is the presence of bad sectors on it.
Please note that the program will be able to fix only those sectors that are damaged at the software level. Sectors that are physically damaged can only be blocked by the program, but not fixed.
Victoria is a free utility that is freely available to download and use. The official website of the program is http://hdd.by/victoria/. Also, the program is available for download on many file hosting sites.
To check the disk for surface defects or bad sectors, as well as fix them using Victoria:

Here you can set the beginning and end of the test area, which is set to the entire disk by default: these are the Start LBA - End LBA fields. And also, the program's actions at the end of the test (see the End of test pop-up menu), test selection, etc. For a simple test, it's best not to change anything.
The principle of the program is as follows: the entire disk is divided into sectors of the same length, and the program sends a request to each sector. The longer the waiting time for a response from a sector, the more likely it is to fail. The reason for this may be both physical wear and tear of the hard drive, and improper behavior with it. Broken sectors are hidden from the disk by replacing them from the spare area of \u200b\u200bthe disk.
Before testing, you must set the Ignore, Remap, Erase, Restore switch.
- In the Ignore mode (ignore) - analysis and display of information. As you can see from the test image, we started testing in this particular mode.
- Remap (remap) is a mode of replacing bad or bad sectors with working ones from the spare area of \u200b\u200bthe disk;
- Using the Restore mode - you can restore those sectors that are damaged at the software level;
- Erase is an attempt to write to a bad sector for further use. This mode is recommended for advanced users only, as improper use can damage the disc and result in data loss.
As you can see, as a result of testing, Victoria analyzes the disk and displays the number of sectors depending on the response time of each of them. This information is duplicated on the chart in the window on the left.

Sectors that are highlighted in orange are already considered problematic, red or blue are damaged bad sectors. Green sectors are sectors with some response delay, but they do not need to be corrected yet.
If testing is completed with bad sectors, then the following actions can be performed to fix them:
- You can go through the disc in Remap mode.
- If after that the bad sectors remain, then the disk can be tested again in the Restore mode.
To do this, just select the required mode and start it again by pressing the Start button.

You need to understand that Victoria is a good utility, but it is not a panacea for all hard drive problems, but rather is designed to test a working hard drive, without physical damage, and fix bad sectors programmatically. Victoria will not fix wear or physical damage.
Lost data, as a result of bad or bad sectors on the hard disk, can be recovered using
Purpose of the programThe Victoria program is designed to test various drives: HDD, flash, RAID arrays, and also allows you to hide defects on the HDD surface, if such an opportunity exists. The author of the program, Sergey Kazansky, is distributed free of charge, you can download it http://hdd-911.com/
Brief description of the program
On Vista and older systems, the program must be run as Administrator even if your account has administrator rights.
The program window is divided into several tabs: Standart, SMART, Test, Advanced and Setup. The API and PIO switches change the mode of operation of the program with the tested disk. PIO mode requires chipset support motherboard... Modern systems younger than about 2011 do not support this program operation mode, so we will not describe it. Here is a brief description of the controls in the tabs.
Standart. The window on the right shows a list of drives installed in the system. These are not only hard drives, but also USB sticks, SD, CF and other memory cards readers. They can be tested too. The choice of a device for testing is done by clicking on the desired item. Directly to the left of the Drive ATA passport window, information about the selected device is displayed. Seek, Acoustic menegment & BAD "er runs the seek test, allows AAM to be driven (if supported by the drive) and simulate bad sectors on the drive.
S.M.A.R.T. Pressing the Get SMART button reads SMART. USB drives are not supported. The remaining buttons SMART ON, SMART OFF, Auto save attributes ON / OFF allow you to enable / disable SMART monitoring, save the read attributes.
Test. The main tab, with which we will work in the future. The Start LBA / End LBA windows define the beginning and end of the area under test. By default, the entire disk is tested. Pause - pauses the test, the value changes to Continue. Start - starts the selected test, changes the value to Stop - stops the test. Rhombus with green arrows - moving forward or backward along the surface of the disc. Block size - the size of a block of sectors read at a time, you do not need to touch it. Timeout - the time after which, if there is no response from the drive, the program will transfer to the next sector. End of test - what to do at the end of the test: stop the disk, start the test from the beginning, turn off the disk or turn off the computer. The color bar shows the number of blocks with the specified read time. Switches Verify, Read, Write - test selection. Verify - check: the disk reads the sector, but does not transfer its contents to the computer. Read - reads a sector into the computer. Write - erase sector - this test destroys user data. Switches Ignor, Remap, Restore, Erase - work mode with bad blocks. Ignor - skip. Remap - try to reassign a sector from the reserve. Restore - try to subtract data and write back (does not work on modern drives\u003e 80GB). Erase - an attempt to write to a bad sector. It can be corrected if an incorrect check sum (CRC) is written to the sector. \u003e - forward test execution.<- выполнение теста назад: с конца диска. >?< - чтение по случайным адресам. >|< - тест «бабочка»: чтение попеременно сначала и с конца диска. Break All – отмена всех команд. Sleep – остановить диск. Recall – включить диск снова (после sleep).
Advanced. The main window shows the contents of the sector specified in the Sec field. The window below shows the contents of the partition table by the View part data button. MBR ON / OFF buttons enable / disable the ability to recognize partitions in operating system.
An example of working with the Victoria program For an example of testing a disk, let's take a faulty WD2600BEVT HDD with surface damage and bad attributes in SMART. We launch the program, select our disk and see the following: on the left we see the parameters of the selected disk.
Further, on the SMART tab, you can see the SMART of our disk. Here he is.

We see that the program interprets it as bad. Let's take a closer look.
Attribute 5 Reallocated sector count - the number of reassigned sectors 1287 - the disk is "crumbled".
Attribute 197 Current pending sectors - the number of sectors-candidates for reassignment, when the 5th attribute is full, it means that the disk is "crumbled", the surface is rapidly degrading.
This means that if you need data from a disk, then you need to copy it immediately, and not try to repair such a disk. The actions that we consider next can lead to loss of information.

Errors of the UNCR type are visible - these are bad, unreadable sectors - bad blocks.
You can uncheck the Grid checkbox, then the disk reading graph will be displayed. In places of bads, speed dips are visible, marked in red.

At the end of the test, you can try to hide the bad sectors by selecting the Remap mode. This can help if there are bad, but SMART does not have the BAD status yet. It looks like this:

The result of the remap can be viewed by reading the smart disk. Here he is:

The value of the 5th attribute increased and became 1291. During normal operation, the disks, in the absence of access to them, launch their own procedures for checking and reassigning sectors in the background, and the number of candidates for remap, in the hundreds, indicates that the disk can no longer maintain conditional condition and to be replaced. And not always the SMART state "but adequately describes the state of the disk - it can be badly damaged, and the SMART status is displayed as GOOD.